
A thorough Amazon PPC audit follows six ordered stages: listing health, review signals, campaign structure, metric calculations (ACOS/TACoS/ROAS), keyword harvesting and negatives, then bids, placements and budget pacing. Run in that sequence, a first-pass audit takes roughly 2–3 hours for a small catalogue (under 20 ASINs), 4–6 hours for a medium one (20–100 ASINs), and a full day for a large account. After the first pass, a monthly check of the same reports keeps performance from drifting.
The six stages at a glance:
- Listing health — check the Listing Quality Dashboard, title, bullets, images and backend search terms before touching a single bid
- Review signals — confirm review count and rating are not suppressing conversion
- Campaign structure — verify auto/manual separation, match-type segmentation and brand isolation
- Metric maths — calculate ACOS, TACoS, ROAS, CTR, CPC and CVR against your break-even
- Keyword harvesting and negatives — mine the Search Term Report and add negatives for money pits
- Bids, placements and budget pacing — adjust placement modifiers, daily budgets and bid strategy last
You can run the entire first pass using only Seller Central and Advertising Console reports; paid tools speed repeated work but are not required to start.
Key takeaways
A structured Amazon PPC audit, run in the order listing health → campaign structure → keyword harvest → bids, consistently produces faster and larger gains than jumping straight to bid changes.
| Point | Details |
|---|---|
| Start with listing health | Fix LQD flags and indexation gaps before adjusting any bids. |
| Pull seven reports first | Search Term Report, Bulk file, Business Reports, LQD, Placement Report, Targeting Report, Brand Analytics. |
| Use the four-bucket method | Sort search terms into Winners, Potential, Money Pits and Low Data for repeatable harvest decisions. |
| Prioritise negatives in week one | Add negative exact matches for all Money Pit terms with 10+ clicks and zero orders immediately. |
| Osellpa automates the repeat cycle | API sync, automated harvest and negative rules replace monthly manual exports for ongoing audit management. |
Table of Contents
- What should an Amazon PPC audit actually check?
- How to run the audit step by step
- Which PPC metrics matter and what should you do with them?
- What do audits typically find, and how do you fix each issue?
- How should you prioritise fixes across 7, 30 and 90 days?
- Which tools and templates should you use for the audit?
- How does automation speed up the audit process?
- A practitioner’s view on what sellers most often skip
- Osellpa makes the audit faster and the fixes stick
- Primary sources and further reading
- Sources
What should an Amazon PPC audit actually check?
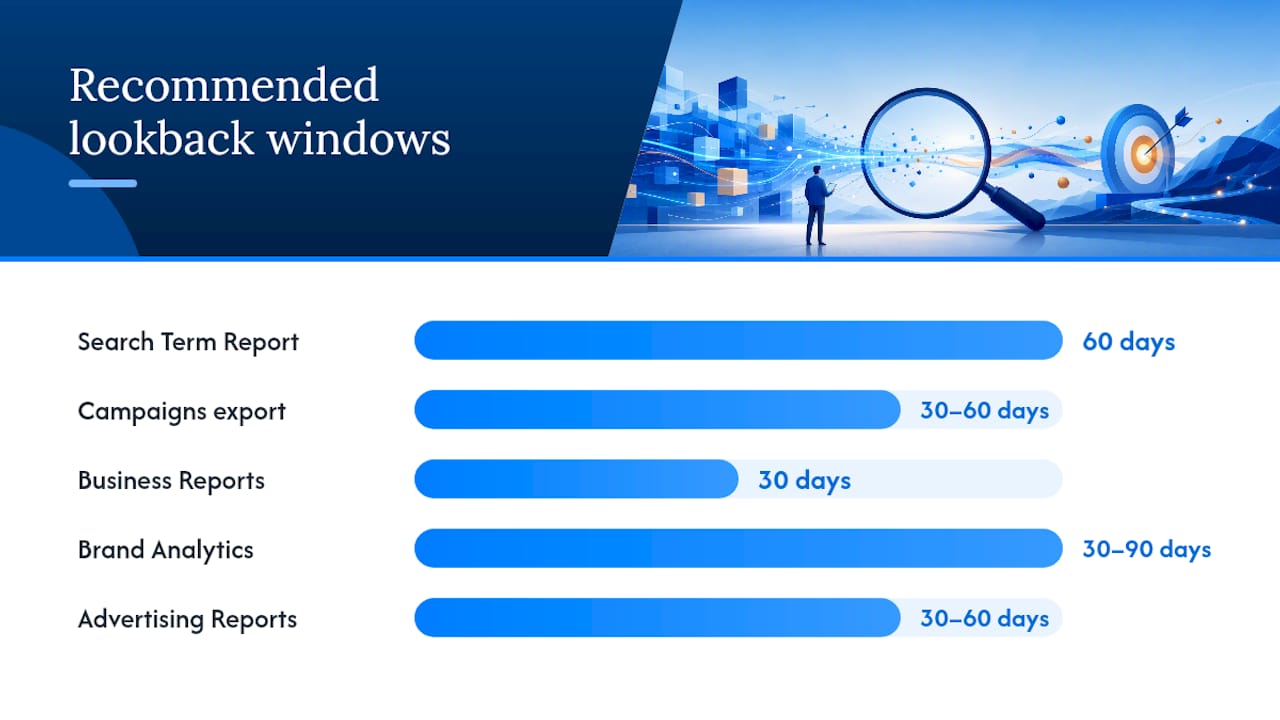
The audit covers more ground than most sellers expect. The table below maps each audit area to the exact report or screen to pull and the date range that gives a reliable signal.
| What to pull | Where to find it | Recommended date range |
|---|---|---|
| Search Term Report | Advertising Console → Reports → Sponsored Products | 60 days (90 days for low-traffic ASINs) |
| Campaigns export / Bulk file | Advertising Console → Bulk Operations → Download | 30–60 days |
| Business Reports (ASIN detail) | Seller Central → Reports → Business Reports → By ASIN | 30 days |
| Listing Quality Dashboard | Seller Central → Inventory → Listing Quality Dashboard | Current snapshot |
| Brand Analytics (if available) | Seller Central → Brand Analytics → Search Frequency Rank | 30–90 days |
| Placement Report | Advertising Console → Campaigns → Placements tab | 30 days |
| Advertising Reports (targeting) | Advertising Console → Reports → Targeting | 30–60 days |
Once you have those files open, the checklist of audit areas breaks down as follows:
- Listing health maps to the Listing Quality Dashboard and Business Reports (unit session percentage)
- Wasted search terms map to the Search Term Report sorted by spend with zero or low orders
- Campaign structure maps to the Campaigns export and Bulk file tabs
- Placement performance maps to the Placement Report (top of search vs product pages vs rest of search)
- Keyword gaps map to Brand Analytics (search frequency rank for your category terms)
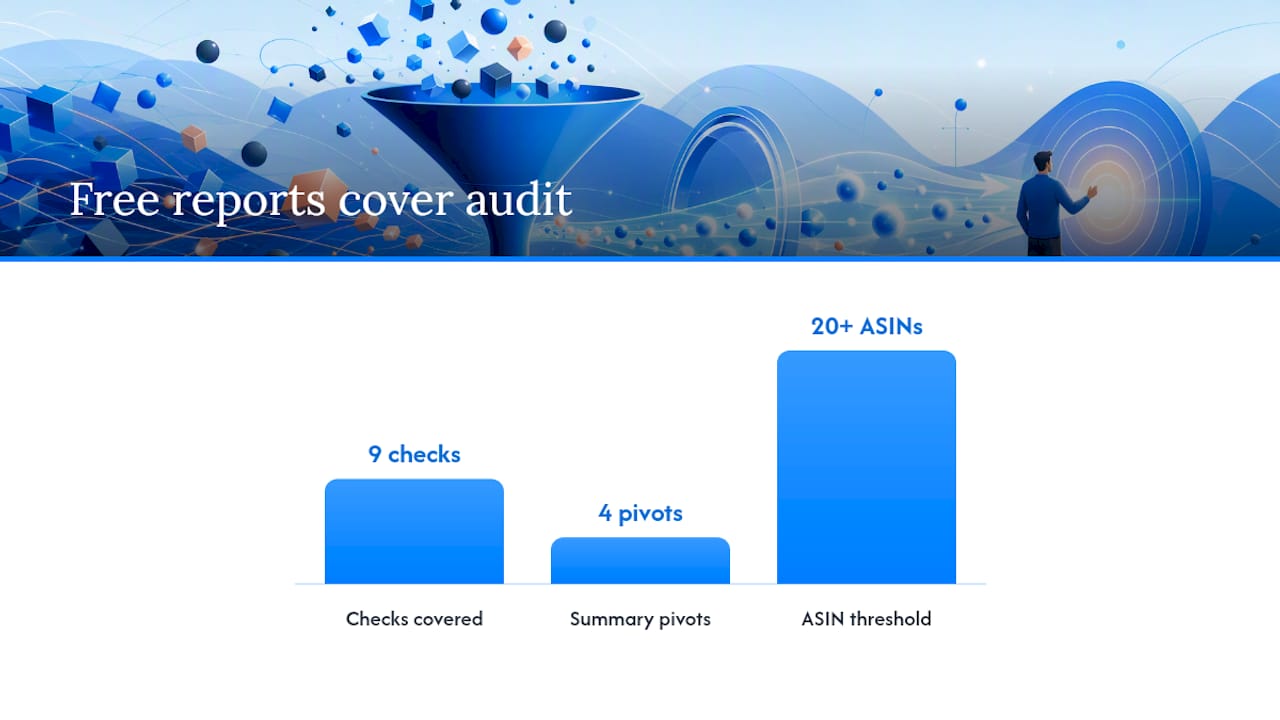
According to the nine-check audit checklist from Mike Begg, a seller can run a first-pass audit in roughly 60–90 minutes using only these Seller Central reports and a spreadsheet. The checklist uses pass/fail thresholds for each check, which makes it straightforward to hand over to a team member or agency.
How to run the audit step by step
This workflow follows the foundation-first order: listing and reviews before campaign structure, keyword work before bid changes. Skipping ahead to bids without fixing the listing is one of the most common reasons audits produce little improvement.
Step 1: Check listing health and indexation first
Before opening a single campaign report, pull the Listing Quality Dashboard for every ASIN in scope. The LQD provides per-ASIN quality scores and flags missing attributes that directly affect search visibility. Note every red or amber flag. Then run a quick indexation check: search ASIN:B0XXXXXXXX keyword in the Amazon search bar to confirm your target terms are indexed. If they are not, no bid will surface that listing for those terms.
This is also the stage to check review count and average rating. A listing with fewer than 15 reviews or a rating below 3.8 will suppress conversion regardless of how well the campaign is structured.
Step 2: Export and organise your files
Download these files in one session so all data covers the same period:
- Search Term Report (60 days, all Sponsored Products campaigns)
- Targeting Report (30–60 days)
- Campaigns export via Bulk Operations (download the full bulk file, not just the summary)
- Business Reports → Detail Page Sales and Traffic by ASIN (30 days)
- Placement Report (30 days)
Open the bulk file first. The tabs you need are: Sponsored Products campaigns, ad groups, keywords, and search terms. Rename each tab with the date range so you can compare across future audits.
Step 3: Run the campaign structure check
In the Campaigns export or bulk file, filter by campaign name and check:
- Are auto campaigns separated from manual campaigns?
- Are broad, phrase and exact match types in separate campaigns or at least separate ad groups?
- Is branded spend isolated in its own campaign so you can track brand defence separately?
Structural problems at this level cause cross-campaign waste — auto campaigns bidding on terms already covered by exact-match manual campaigns, for instance, inflates spend without adding incremental sales.
Step 4: Sort the Search Term Report into four buckets
This is the most time-intensive step and the one that produces the most immediate savings. In a spreadsheet, add a column called Bucket and sort every search term into one of four categories:
- Winners — good ACOS, multiple orders, relevant to the product
- Potential — clicks and some orders but ACOS above break-even; worth testing with a bid reduction
- Money Pits — spend with zero or very few orders; add as negatives immediately
- Low Data — fewer than 5 clicks; monitor for another 30 days before acting
This four-bucket framework replaces ad-hoc decisions with a repeatable system. Winners should be moved to exact-match manual campaigns if they are not already there. Money Pits need negative exact-match entries added at the campaign level.
Step 5: Build the key pivot views
With the Search Term Report in a spreadsheet, create four pivot tables:
- Spend by search term (descending) — surfaces the biggest cost drivers instantly
- ACOS by match type — shows whether broad or auto is burning budget disproportionately
- Conversions by placement — top of search vs product pages vs rest of search
- Branded vs non-branded spend — filter by your brand name to separate the two pools
These four views answer the most common audit questions in under 20 minutes once the pivot tables are built.
Step 6: Check placements and bids
Open the Placement Report and compare ACOS and conversion rate across the three placement types. If top-of-search ACOS is significantly lower than product-page ACOS, reduce the product-page placement modifier.
Bid changes come last. Adjust bids based on the metric calculations in the next section, not before.
Pro Tip: Use a 30-day window for initial bid decisions and a 90-day window to validate trends. A 30-day window can be skewed by a single promotion or a stock-out; the 90-day view smooths those anomalies and gives a more reliable ACOS baseline.
Download checklist before you start:
- Search Term Report (60 days)
- Targeting Report (30–60 days)
- Bulk file (all campaigns)
- Business Reports by ASIN (30 days)
- Placement Report (30 days)
- Listing Quality Dashboard (current snapshot)
- Brand Analytics if available (30–90 days)
Which PPC metrics matter and what should you do with them?
Knowing the formula is only half the job. The decision each metric triggers is what separates a useful audit from a data exercise.
| Metric | Formula | What it shows | Decision trigger |
|---|---|---|---|
| ACOS | (Ad spend ÷ Ad revenue) × 100 | Cost of advertising relative to ad-attributed sales | If above break-even ACOS, reduce bids or add negatives |
| TACoS | (Ad spend ÷ Total revenue) × 100 | Ad spend as a share of all sales (organic + paid) | Rising TACoS signals organic rank is not growing; falling TACoS signals healthy organic momentum |
| ROAS | Ad revenue ÷ Ad spend | Revenue generated per £1 of ad spend | Below 3× for most categories warrants a structural review |
| CTR | (Clicks ÷ Impressions) × 100 | How often searchers click your ad | Below 0.3% on Sponsored Products suggests a weak main image or title |
| CPC | Ad spend ÷ Clicks | Average cost per click | Rising CPC with flat conversion rate compresses margin; review bids and match types |
| CVR | (Orders ÷ Clicks) × 100 | Percentage of clicks that convert to orders | Below 8–10% for established ASINs points to a listing or pricing problem, not a bid problem |
Calculating your break-even ACOS is straightforward. Any campaign running above that figure is losing money on every ad-attributed sale. Target ACOS is typically set 5–10 percentage points below break-even to preserve a profit buffer.
Benchmarks vary by category and stage.
A rising TACoS combined with a falling ACOS is a warning sign: it means organic sales are declining even as ad efficiency improves, which often points to a listing or review problem rather than a campaign problem.
What do audits typically find, and how do you fix each issue?
Most accounts share the same handful of problems. The fixes are specific and repeatable.
Poor campaign structure
Auto and manual campaigns running the same keywords with no bid differentiation. Auto campaigns should harvest new terms, not compete with your proven exact-match keywords.
Duplicate keywords across campaigns
The same keyword appearing in broad, phrase and exact match within the same campaign, or in multiple campaigns without a clear hierarchy. Fix: audit the bulk file keywords tab, filter by keyword text, and remove duplicates. Keep exact match in the manual campaign; add the same term as a negative exact in the auto and broad campaigns.
Missing negative keywords
The single most common finding. Fix: from your Money Pits bucket (search terms with 10+ clicks and zero orders), add negative exact matches at the campaign level immediately. For terms with 5–9 clicks and zero orders, add them as negative phrase matches and monitor.
Budget burnout before midday
Campaigns exhausting their daily budget by 11 AM, leaving the afternoon uncovered. Fix: check the hourly impression share in the Advertising Console. If budgets are capping out, either increase the daily budget or reduce bids on low-converting ad groups to extend reach across the full day.
Ignored placement modifiers
Weak listing conversion
An audit finding that no bid change can fix. Main image and title improvements can move CTR by 20–40%, and listing fixes frequently deliver larger gains than bid changes alone. Check the Listing Quality Dashboard for missing attributes, then review the main image, title and bullet points against the top three organic competitors.
How should you prioritise fixes across 7, 30 and 90 days?
Not every finding needs the same urgency. Prioritise by impact multiplied by ease of implementation.
| Timeframe | Action | Owner | Time to implement | KPI to watch |
|---|---|---|---|---|
| Day 1–7 | Add negative keywords (Money Pits bucket) | Seller / tool | 1–2 hours | Wasted spend, ACOS |
| Day 1–7 | Fix LQD flags (missing attributes, suppressed listings) | Seller | 2–4 hours | Unit session %, impressions |
| Day 1–7 | Reallocate budget from zero-order campaigns | Seller | 30 minutes | Spend distribution |
| Day 7–30 | Rewrite listing title, bullets and main image | Seller / copywriter | 3–5 days | CTR, CVR |
| Day 7–30 | Restructure campaigns (separate auto/manual, isolate brand) | Seller / agency | 4–6 hours | ACOS by campaign type |
| Day 7–30 | Move Winners to exact-match manual campaigns | Seller / tool | 2–3 hours | ACOS, orders |
| Day 30–90 | Tune bids using 60-day data | Seller / tool | Ongoing | ACOS, TACoS trend |
| Day 30–90 | Monitor TACoS monthly to track organic growth | Seller | 30 min/month | TACoS, organic order share |
| Day 30–90 | Run reverse ASIN check on top competitors | Seller / tool | 1–2 hours | Indexed keywords, auto match quality |
Quick wins in the first seven days focus on stopping the bleeding: negatives, LQD fixes and budget reallocation. These require no creative work and produce measurable results within one to two weeks. The 30-day fixes require more effort but address the structural causes of waste. The 90-day cadence is about compounding gains through bid refinement and organic rank monitoring.
Unresolved LQD flags can reduce visibility and raise suppression risk, so treating them as a Day 1 priority rather than a cosmetic task is well justified.
Which tools and templates should you use for the audit?
A DIY audit using only free Seller Central reports is entirely viable for a first pass. Here is what each source covers and where paid tools add speed.
Free Seller Central and Advertising Console reports
- Search Term Report: the core of any keyword audit
- Bulk Operations file: the fastest way to view and edit all campaigns, ad groups and keywords in one spreadsheet
- Business Reports (by ASIN): unit session percentage and page views for conversion analysis
- Listing Quality Dashboard: per-ASIN quality scores and missing-attribute flags
- Placement Report: placement-level ACOS and conversion data
- Brand Analytics: search frequency rank and click share for category terms (requires Brand Registry)
These reports are sufficient to complete all nine checks in the Mike Begg audit checklist. A spreadsheet with pivot tables handles the analysis.
Spreadsheet template layout
Set up your workbook with one tab per report, a summary tab with your four pivot views, and a Findings tab where you log each issue, its bucket classification, the fix and the owner. This structure makes the audit repeatable and easy to hand over.
Tool categories that speed the work
| Tool category | What it automates | When it adds value |
|---|---|---|
| Reverse ASIN / keyword gap tools | Checks competitor keywords against your listing; flags missing indexed terms | Before restructuring campaigns or writing new listing copy |
| Listing quality tools | Pulls LQD data and scores attributes automatically | For accounts with 20+ ASINs where manual LQD checks are slow |
| Placement analysers | Aggregates placement data across campaigns | For large accounts with many campaigns |
| PPC management platforms | Automates bid changes, harvest rules and negative additions | For ongoing management after the initial audit |
Reverse ASIN analysis is particularly valuable before restructuring campaigns because auto campaigns read listing content directly. If your listing does not index for a keyword, your auto campaign will not match to it, and adding that keyword to a manual campaign will produce poor quality scores. Fix the listing first, then build the campaign.
How does automation speed up the audit process?
Running a manual audit once is instructive. Running one every month across a growing catalogue becomes unsustainable without some automation. The gains from automation are most visible in three areas: data aggregation, harvest and negative management, and repeat cadence.
What sellers typically see after a structured audit
The mechanism is straightforward: automated harvest rules move converting search terms to exact-match campaigns without waiting for a monthly manual review, and automated negative rules add Money Pit terms as negatives within days rather than weeks.
Sellers who automate negative keyword management typically see ACOS improvements within the first billing cycle, because the system catches wasted spend continuously rather than in monthly snapshots.
What Osellpa automates in the audit workflow:
- API sync with Amazon pulls fresh Search Term Report data daily, removing the manual export step
- Automated harvest rules identify Winners and move them to exact-match campaigns on a set schedule
- Negative management rules flag Money Pit terms and add negatives without manual intervention
- Listing quality checks surface LQD flags and missing attributes across all ASINs in one dashboard
- Profit tracking integrates ad spend with COGS and Amazon fees so TACoS and true margin are visible in real time
Data security and permissions: Osellpa connects via Amazon’s official Selling Partner API (SP-API). The integration requires you to authorise access through your Seller Central account using Amazon’s standard OAuth flow. No passwords are shared; access is scoped to the permissions you grant and can be revoked at any time from Seller Central.
A practitioner’s view on what sellers most often skip
The most consistently skipped step in an Amazon advertising audit is the listing and indexation check. Sellers open the Search Term Report first, find high-ACOS terms, and immediately start adjusting bids. The bids change; the ACOS stays stubbornly high. The reason is almost always that the listing itself is not converting, or that key terms are not indexed, so the traffic arriving from those bids was never going to convert at a reasonable rate.
Fix the listing before the bids. It is the single most impactful habit change in PPC management.
Best habits to keep audits repeatable:
- Run the LQD check before every audit session, not just the first one
- Keep a Findings log with dates so you can track whether fixes held
- Use the same date ranges each month so period-over-period comparisons are valid
- Add negatives in batches rather than one at a time; batch additions are faster and easier to review
- Review TACoS monthly as your primary health metric; ACOS alone does not tell you whether organic rank is growing
The single most effective monitoring metric between full audits is TACoS. A flat or falling TACoS with stable or growing revenue means the account is healthy. A rising TACoS is the earliest warning that something structural needs attention, often before ACOS or order count shows a problem.
Osellpa makes the audit faster and the fixes stick
Running a manual audit every month is the right discipline, but it is time-consuming. Osellpa connects directly to Amazon’s SP-API and pulls the same reports you would download manually, then surfaces the findings in a single dashboard so you can act on them without building pivot tables from scratch each time.
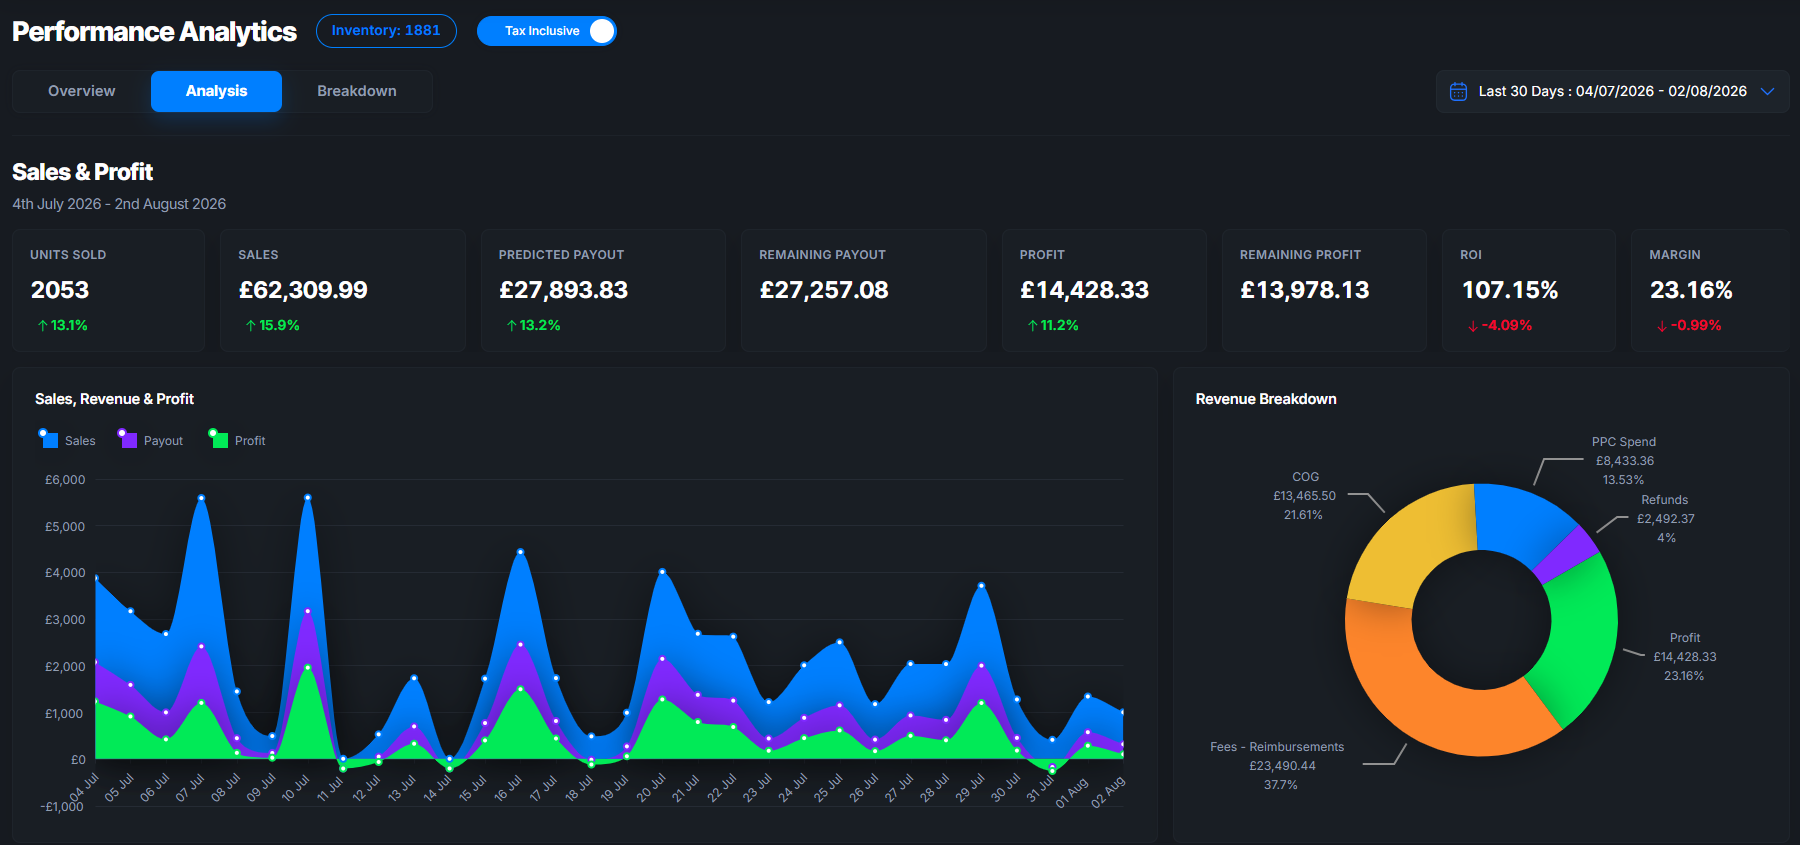
For sellers who have completed their first manual audit and want to maintain that discipline without the monthly spreadsheet work, Osellpa maps directly onto the audit workflow: automated harvest and negative management handle the Search Term Report continuously, listing quality checks flag LQD issues as they appear, and profit tracking keeps TACoS and true margin visible alongside ad spend. The result is a shorter gap between a problem appearing and a fix being applied.
Osellpa’s subscription is based on your Amazon sales volume, so the cost scales with the size of the account it is managing. You can explore the full feature set and start a trial at Osellpa.
Primary sources and further reading
The following sources were used to build this audit guide. Each link leads directly to the referenced material.
- How to Audit Your Amazon Ads Account: The 7-Stage Method — BTB Audits; conceptual framework for the foundation-first audit order (listing → structure → bids)
- Amazon PPC Audit Checklist & Free Template (2026) — Mike Begg; nine-check checklist and downloadable spreadsheet template for a first-pass audit
- The best Amazon PPC audit guide for 2026 (and the step every agency skips) — Keywords.am; reverse ASIN / Step Zero methodology and the four-bucket Search Term Report framework
- Amazon Listing Quality Dashboard Explained — Flat Magic; per-ASIN quality scores, attribute tiers and how LQD data maps to search visibility
- Amazon’s Listing Quality Dashboard Explained: Why Listings Lose Visibility — Seller Candy; LQD flags as compliance and completeness signals and their suppression risk implications